This tutorial assumes:
- You have opened an installed version of FMPlus.
- You have permission to add Customers.
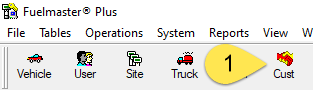
1.Select Cust (Customer).
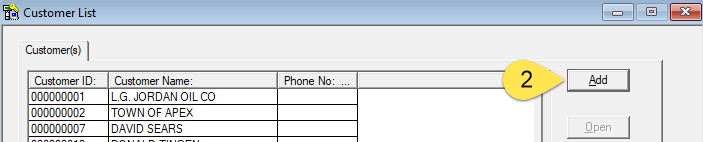
2.Select Add.
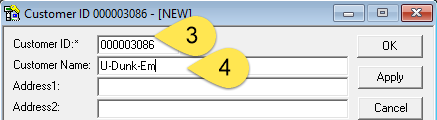
3.Enter a Customer ID.
4.Enter a Customer Name.
5.Select OK.
This tutorial assumes:
1.Select Cust (Customer).
2.Select Add.
3.Enter a Customer ID.
4.Enter a Customer Name.
5.Select OK.
This tutorial assumes:
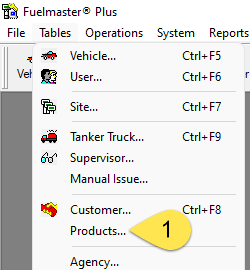
1.Select Tables > Products.
2.Select Add.
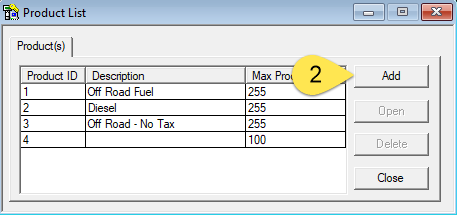
3.Enter or select the desired Product ID, Description, Max Product Allotment, Units (of Issue), Base Cost, Trans. Limit, and Map To for the new product.
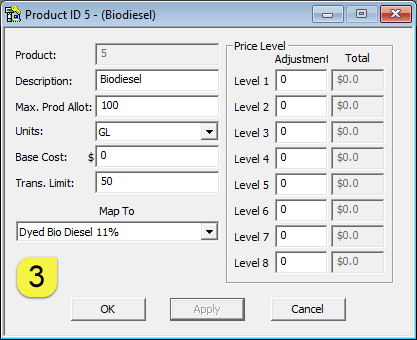
4.Select OK.
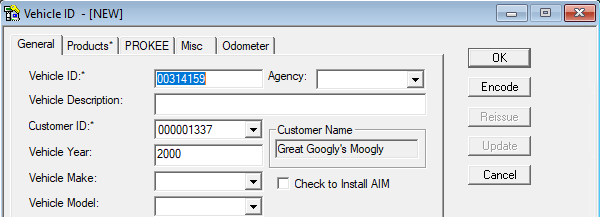
This tutorial assumes:
1.Select Vehicle

2.Select Add
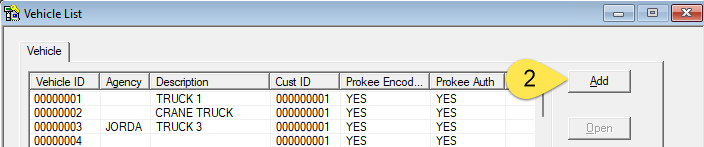
3.On the General tab, enter a Vehicle ID.
4.Select a Customer ID from the dropdown menu.
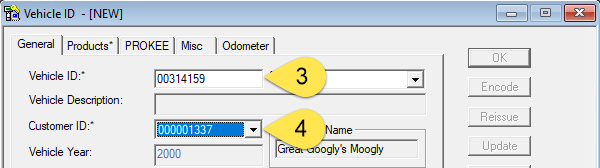
5.On the Products tab, select all applicable Products.

6.Select OK.
This tutorial assumes:
1.Select User.
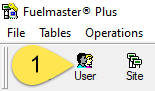
2.Select Add.
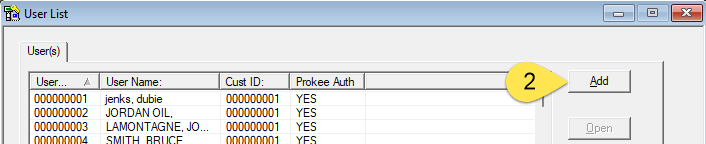
3.Enter a User ID.
4. Select a Customer ID from the dropdown menu.
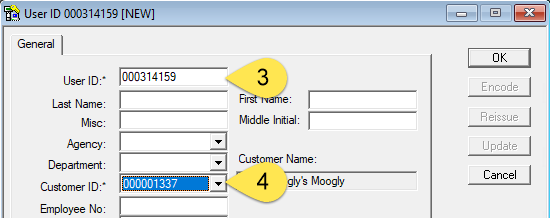
5. Select OK.
This tutorial assumes:
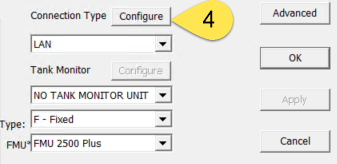
1.Select Site.
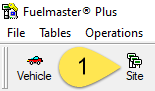
2.Select Add.
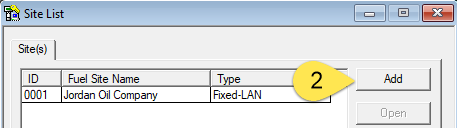
3.Enter a Site ID.
4.Enter an FMU Type.
5.Select the Connection Type dropdown to select phone or LAN connection.
6.Select the Configure button.
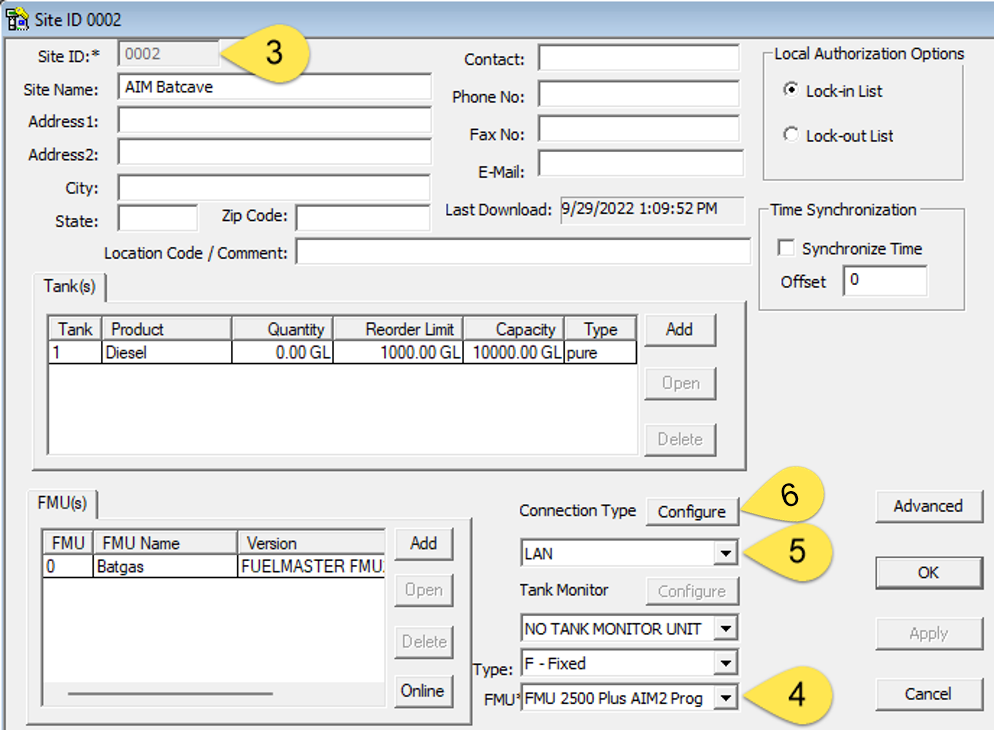
7.Configure your connection:
a. LAN: Configure the IP address assigned to the FMU.
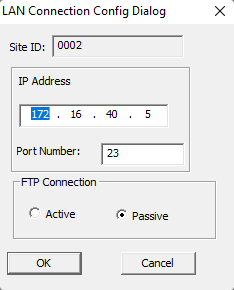
b. Phone: Configure the phone number assigned to the FMU.
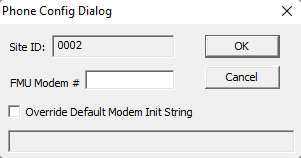
8.Select OK; then, select OK again.
This tutorial assumes:
1.Select Site.

2.Select the Site to which you want to add an FMU, and select Open.

3.In the FMU(s)section, select Add
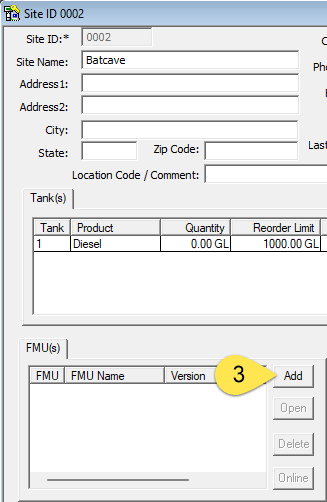
4.Enter the FMU Name.
5.Select OK.
This tutorial assumes:
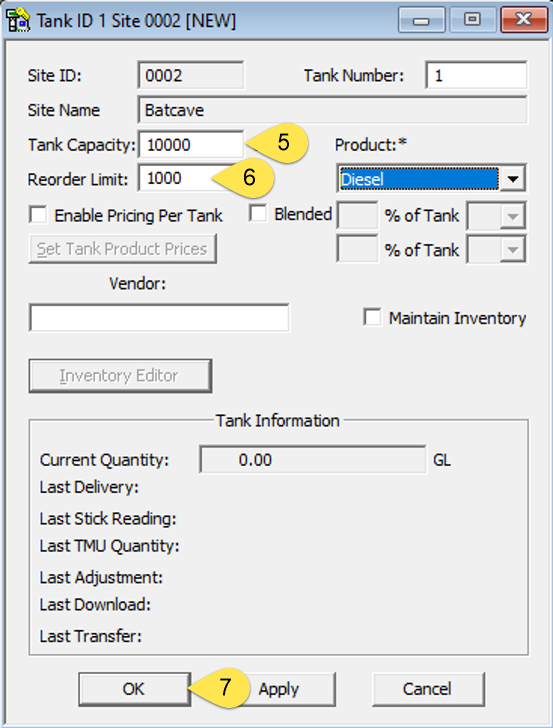
1.Select Site.
2.Select the Site to which you want to add a tank, and select Open.
3.In the Tank(s) section, select Add.
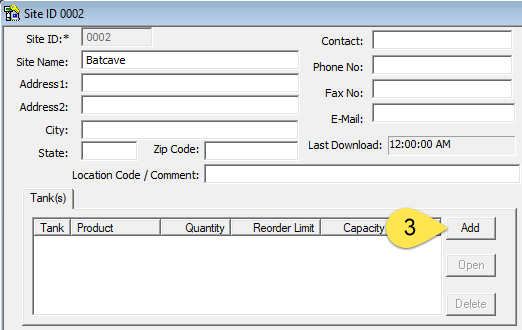
4.Select the Product the tank will hold from the dropdown menu.
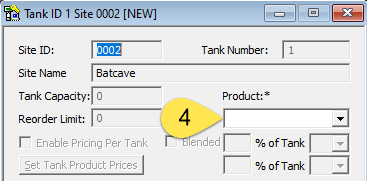
5.Enter the Tank Capacity.
6.Enter the Reorder Limit of the tank.
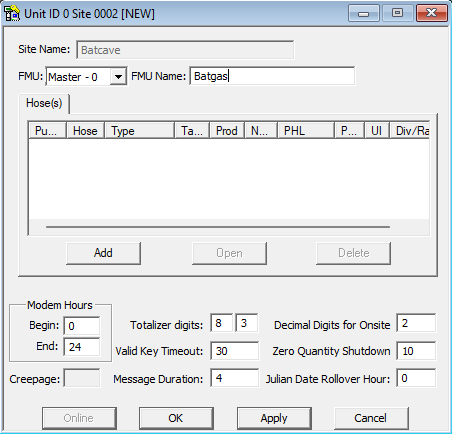
This tutorial assumes:
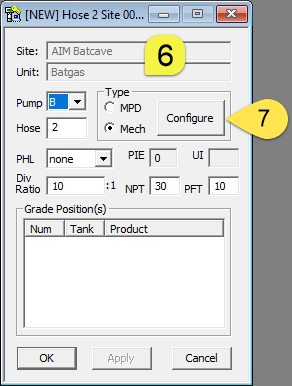
1.Select Site.
2.Select the Site to which you want to add a Hose, and select Open.
3.In the FMU(s) section, select the FMU.
a. FMU: FuelMaster Unit
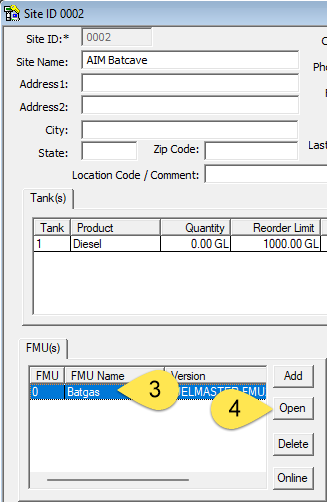
4.Select Open.
5.In the Hose(s) section, select Add.
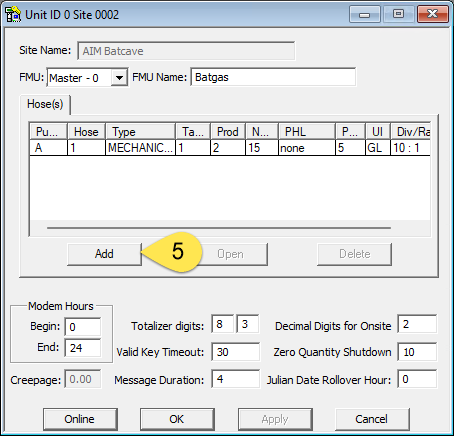
6.Add information on the Pump Position, the Hose Number, the PHL, the NPT, and the PFT.
a. Pump Position: This letter usually corresponds to the hose number. A=1, B=2.
b. Hose Number: The number hose at the fuel island.
c. PHL: Pump Handle - describes how the FMU controls the dispenser. If you're unsure of what this should be, please contact our Customer Satisfaction Center.
d. NPT: No Pulse Timeout - number of seconds the FMU should wait to see quantity information after a transaction has begun.
e. PFT: Pump Finish Timeout - number of seconds the FMU should wait to see if more quantity information is coming after the last update.
7.Select whether the pump is a Mechanical or MPD (Multi-Product Dispenser) (blended), and select Configure.
This tutorial assumes:
1.Select Site.
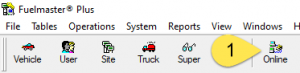
2.Select the Site(s) to which you want to communicate, as well as your Download Options.
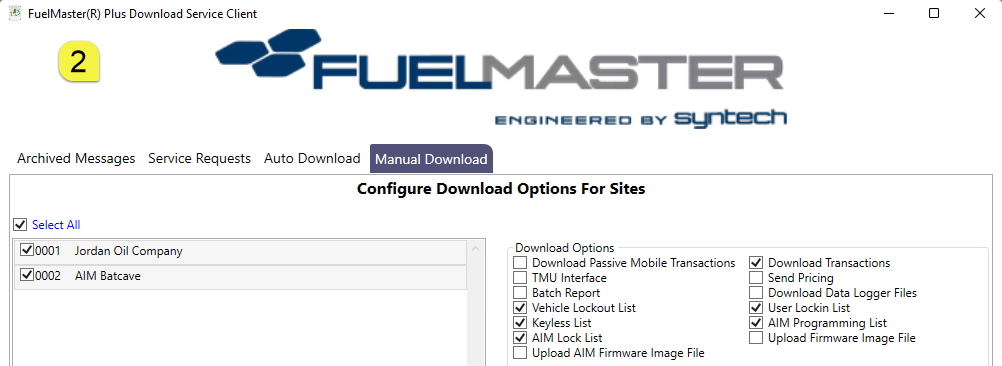
3.Select Connect.

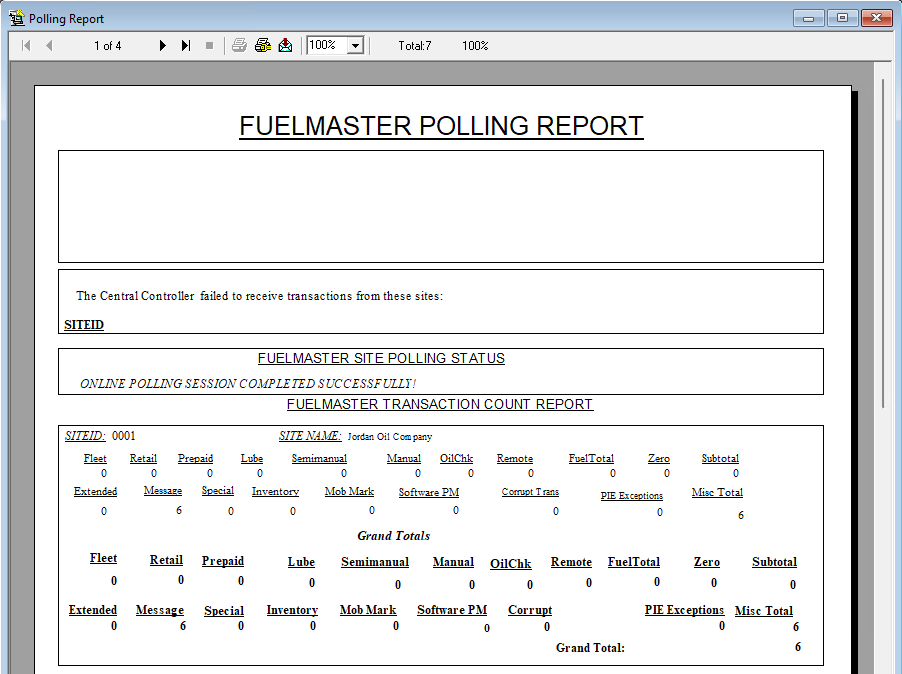
The Status Logger window will open. Once you see **POST PROCESSING COMPLETED..**, the process is complete.
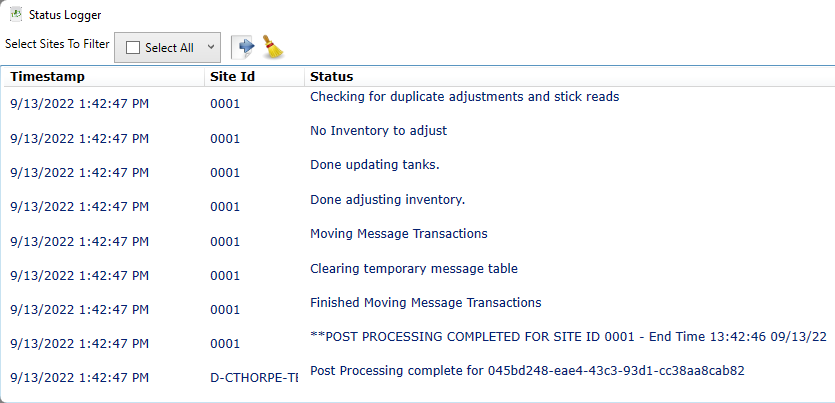
A Polling Report will appear in the software. You should see a message saying, ONLINE POLLING SESSION COMPLETED SUCCESSFULLY! and a breakdown of the transactions downloaded from the FMU.
This tutorial assumes:
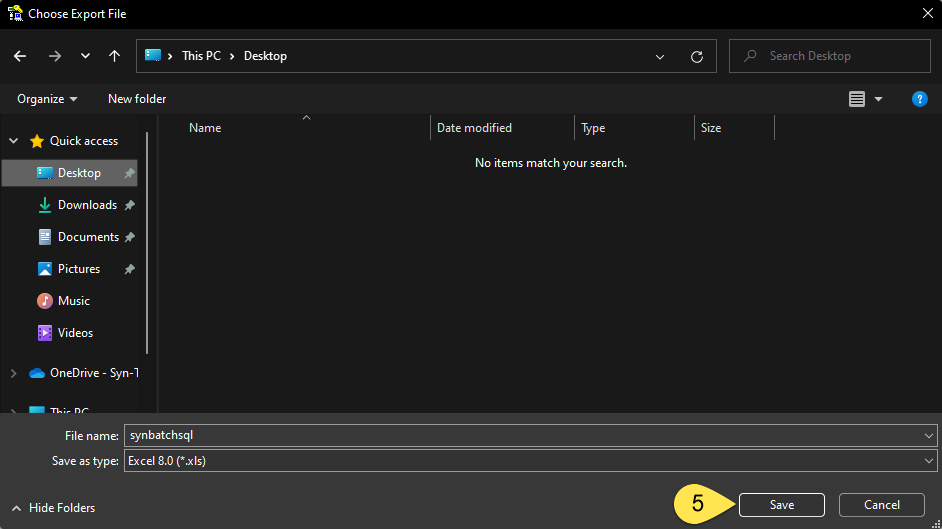
1.Select Operations > Transaction Export...
![]()
2.Use the Selection buttons to change the status of transactions and curate a list of transactions for export. By default, all transactions that appear are considered Exportable.
![]()
3.Select Export

This tutorial assumes:
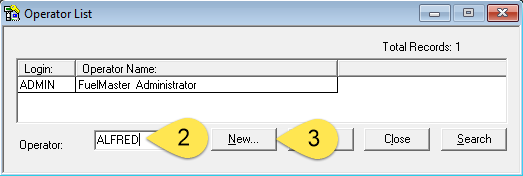
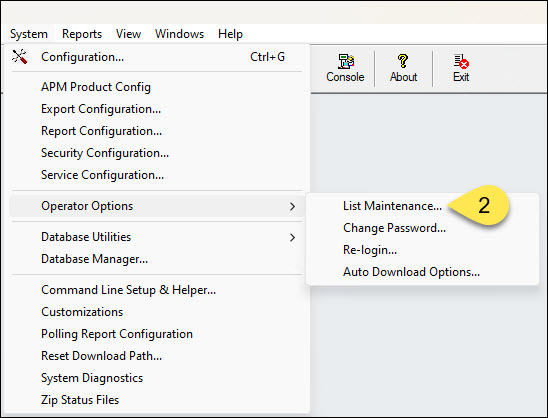
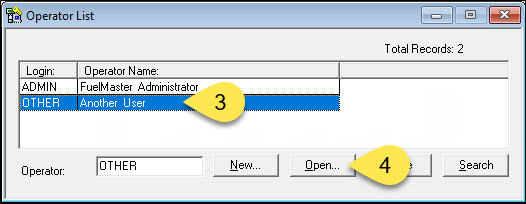
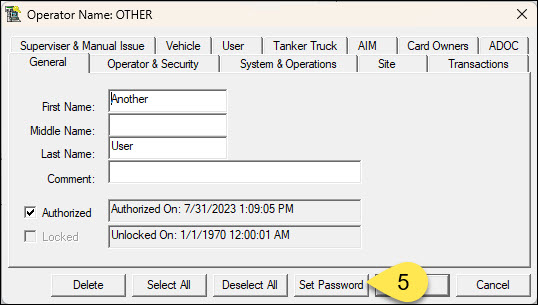
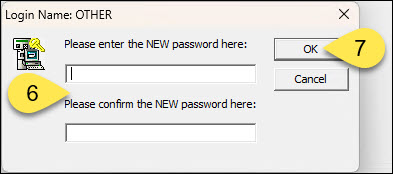
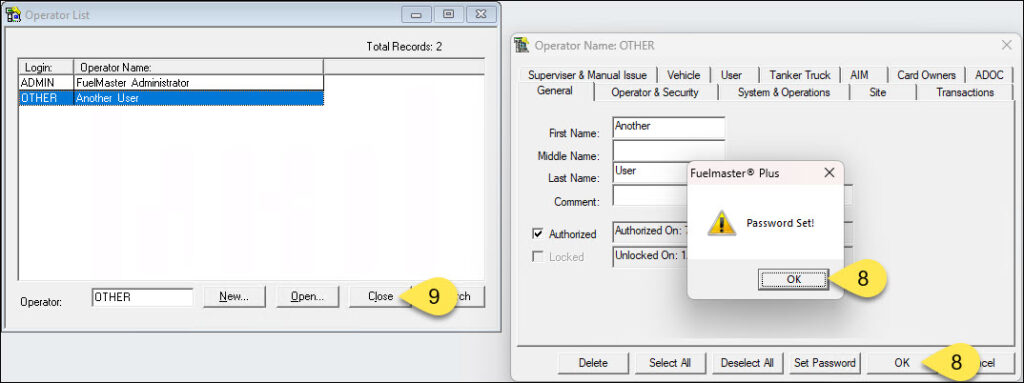
1.Select System > Operator Options > List Maintenance.
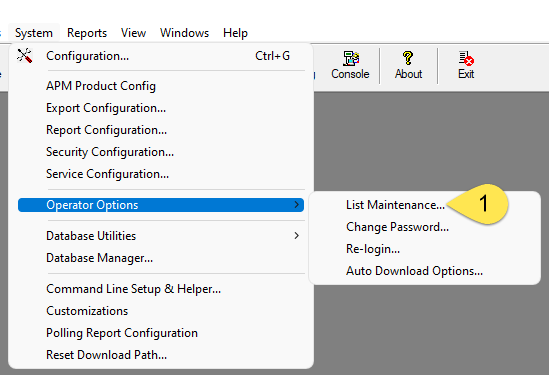
2.Enter Operator Name.
3.Select New.
4.Add any information on the General tab that you'd like.
5.Select the Authorized checkbox.
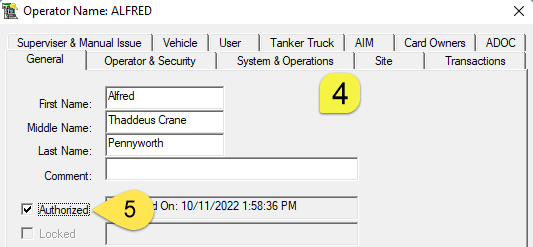
6.Select the proper permissions for the Operator's role.
![]()
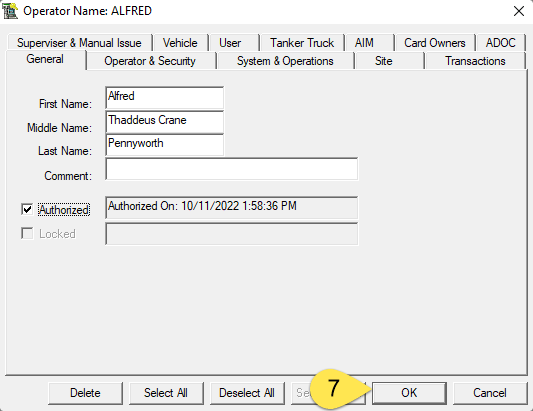
7.Select OK.
1.Is the encoder plugged in?
a. If not, plug it in.
2.Is the red light on top of the encoder lit?
a. If not, there's either something wrong with the encoder or the cable.
b. The cable is a standard USB-A to USB-B cable. Replace the cable and try again.
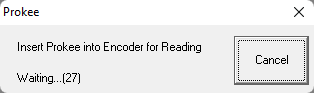
3.Can you read a prokee/smartcard, but not write?
a. In your software, click the Prokee button.
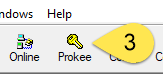
b.. If the software offers to read the key, close the software and reopen.
4.Is the encoder an ARM7 verison?
a. Turn the encoder over and look at the silver label. It should read ARM7, as below.
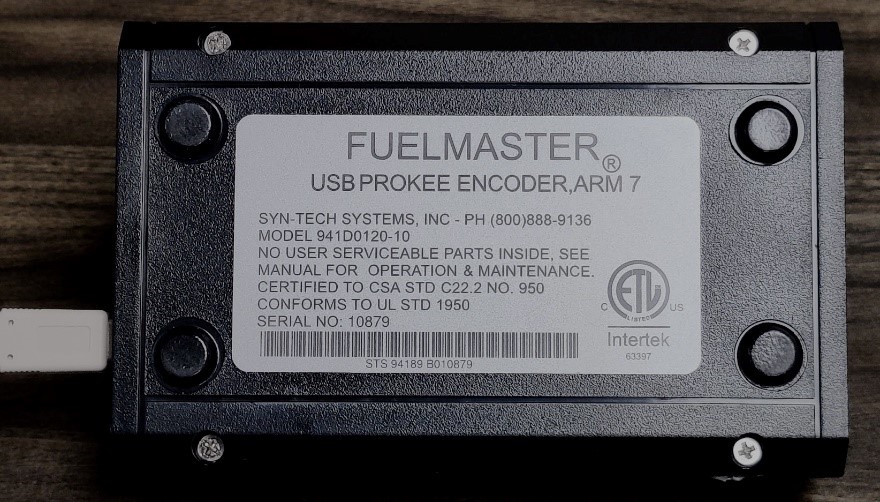
b. If Not, replace the encoder with an ARM7 version.
5. Are the encoder drivers installed?
a.Use this link for instructions and to download the drivers.
6.Will the encoder work in another USB port?
a. Close the software.
b. Using another set of ports is recommended - so move from the front of the PC to the back or from the back to the front.
c. This is the resolution for encoder issues where the software immediately goes unresponsive and crashes.
d. Reopen the software and test.
If none of these troubleshooting steps resolve your encoder issue, please call our Customer Satisfaction Center for further assistance at 1-800-888-9136 x2.
1.Encoder drivers are available on our website at https://www.myfuelmaster.com/download/USBEncoderInstall.zip.
2.On the bottom of the encoder, ensure the label reads USB Prokee (or Smartcard) Encoder, ARM7. If this is not the case, please contact the Syntech Customer Satisfaction Center for a replacement.
3.Open the FuelMaster Plus software, and view the version.
4.Click the About button.
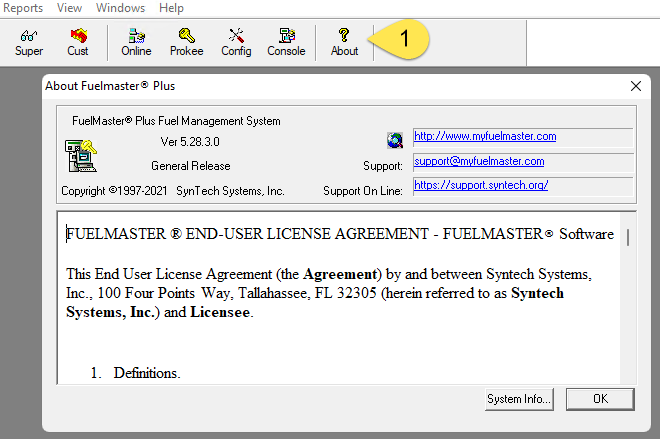
a.If your version of software is older than 5.26.3.0, select Config and ensure the encoder type is set to USB.
![]()
5.Close the software.
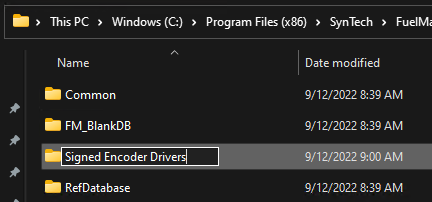
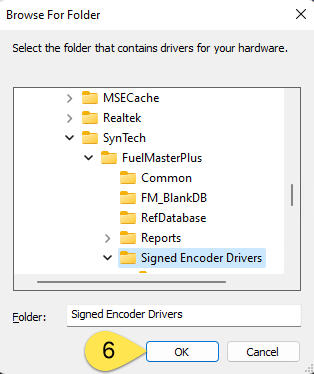
6.Open a File Explorer window and browse to C:\Program Files (x86)\Syntech\FuelMaster Plusfolder.
7.Create a folder named Signed Encoder Drivers
8.Copy the encoder driver files downloaded from myfuelmaster.com into this folder.
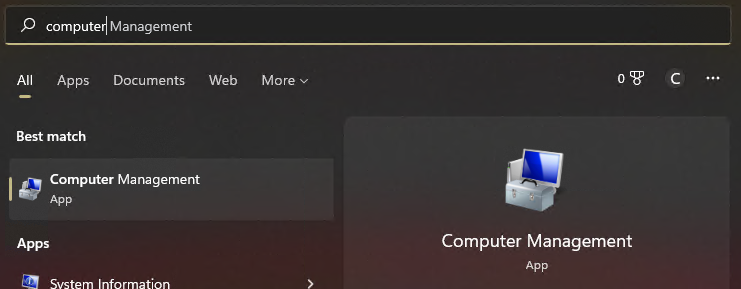
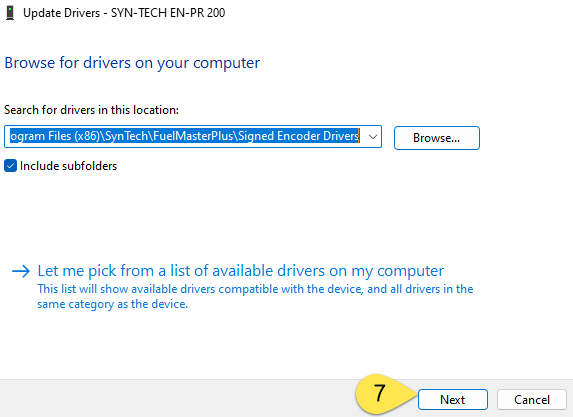
9.Open the Computer Management app. This may need to be run as administrator to install drivers.
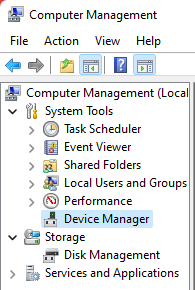
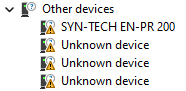
10.On the left side, select Device Manager.
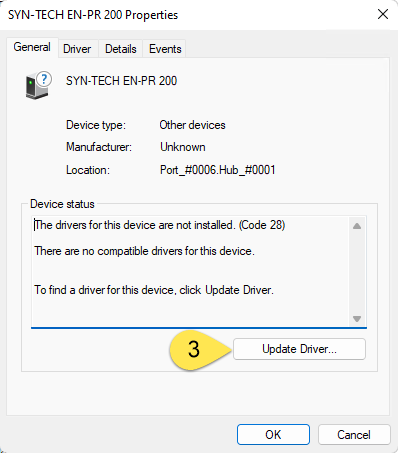
11.Under the Other devices section, find and select the SYN-TECH EN-PR 200 or SYN-TECH EN-SC 200.
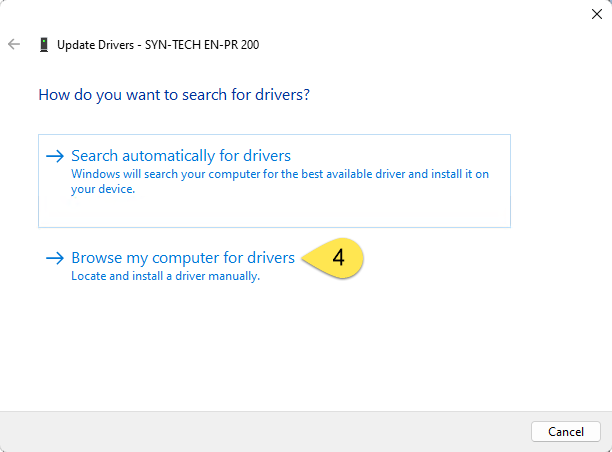
12.Select Update Driver button.
13.Select Browse my computer for drivers.
14.Select Browse...
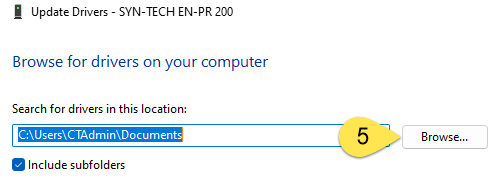
15.Browse through the folder levels to find the path from Steps 5, then click OK.
16.Click Next.
17.Your computer may ask you to verify the driver installation, but when done, you should see that the driver has been installed successfully.
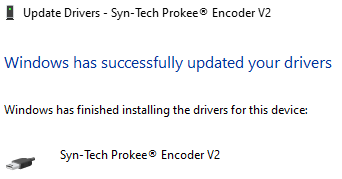
18.Reopen your software and encode the keys or smartcards.
Many apparent connection issues are actually issues with the FMDownload Service. Please check the PC the Service runs on to ensure it's functional. Further information on the Service can be found here.
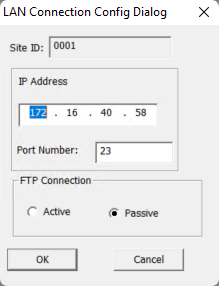
1.Select Site.
2.Select the site for which you need the IP address.
3.Select Open. Depending on settings, this button may be partially obscured.
4.Select Configure.
5.The IP address will be in the middle of the LAN Connection Config Dialog box.
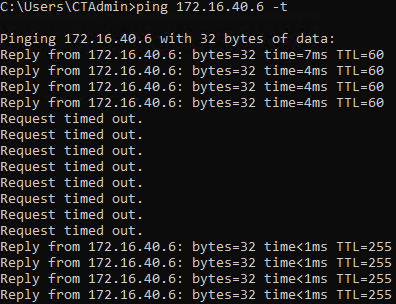
1.In the Windows Start menu, search for and open Command Prompt.
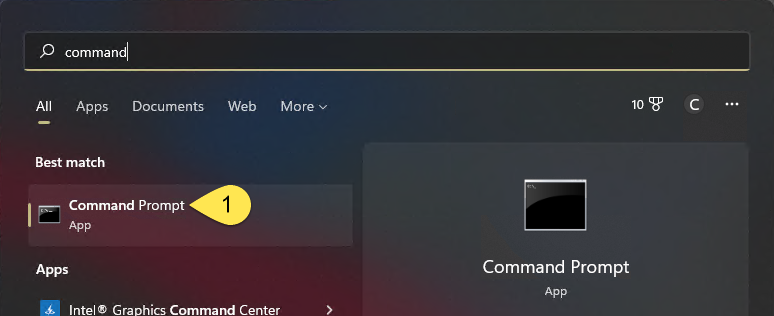
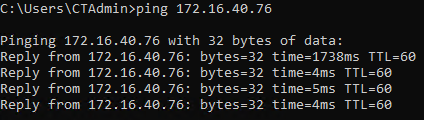
2.Type ping IP ADDRESS in the Command Prompt window, where you substitute the address from the last section.
![]()
You should see a good reply come back, like this:
3.If your ping is inconsistent and looks like the below, contact your IT team. We have seen download issues occur with drop rates as low as 10%.
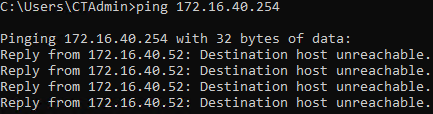
4.If you receive a Destination host unreachable message, contact your IT team for further assistance.
5.If you receive a Request timed out message, please contact us for further assistance.
6.If the reply is good, as in Step7, re-run the test with a -t at the end; then reboot your FMU. you should see a gap as below:
If there's no gap, another device may have the IP address typically reserved for the FMU. the MAC address of the FMU should always start with F8-F7-FF. Contact your IT team for further assistance if this is the case.
If you continue to have issues or questions, please contact us for further assistance at support@myfuelmaster.com or at 1-800-888-9136, Ext. 2.
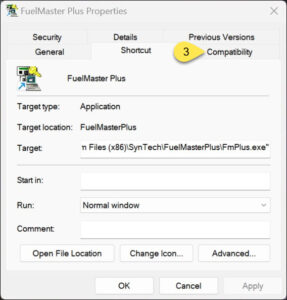
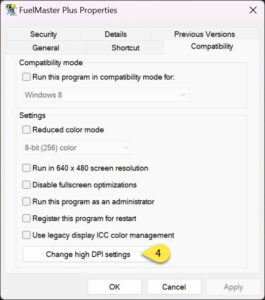
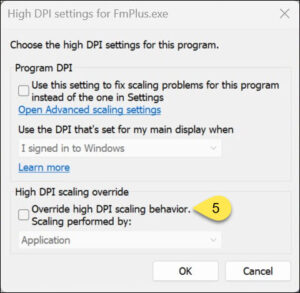
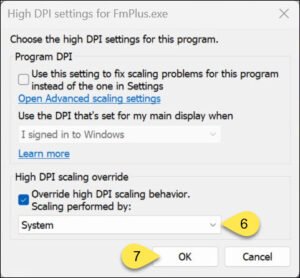
FMPlus (Legacy) Software does not respond well when users utilize scaling of display settings. Typically, you'll see buttons cut off at the side of the screen, as shown below:
This behavior can be changed by overriding the DPI scaling behavior. This allows you to keep your other scaling while having all buttons available in the FuelMaster software.
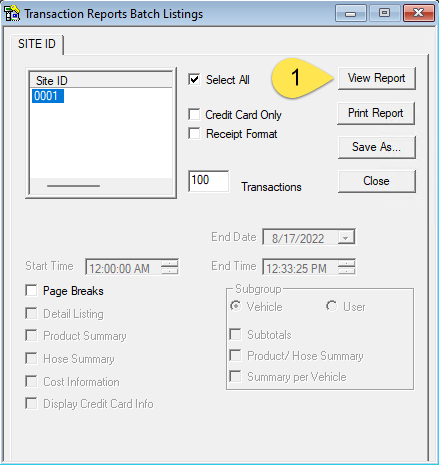
1.Open the FuelMaster Plus Software.
2.Find the report you would like to export.
3.Select your preferred options and click View Report.
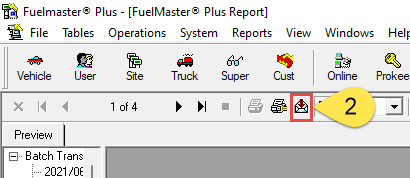
4.Once the report is open, click the Export icon, which looks like an envelope.
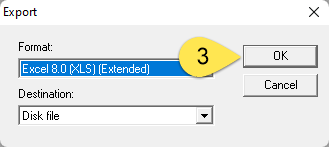
5.In the Export window that comes up, you may choose any of the formats listed. The Destination should be Disk file. Click OK.
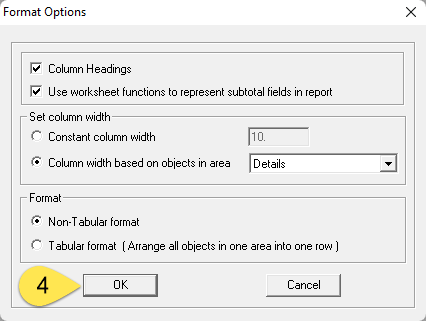
6.If a Format Options window comes up, choose your options, then OK.
7.Browse to the location where you want to export the report, then click Save.
8.Browse to the location to find your report.
The following are manuals for the use of the FMPlus software:
1.Insert the Supervisor's Key.
2.Select B for Issues.
![]()
3.Select C for Pumps.
![]()
4.Select A for shutdown Pump or B for Reenable.
![]()
5.Shutdown - select the hose you want to shutdown or 0 for all.
![]()
6.Reenable - select the hose you want to reenable or 0 for all.
![]()
The Count Test is performed to:
1.Ensure the LCD displays:
FUELMASTER FUEL MANAGEMENT SYSTEM INSERT KEY
HOLD 1 SECOND TO BEGIN
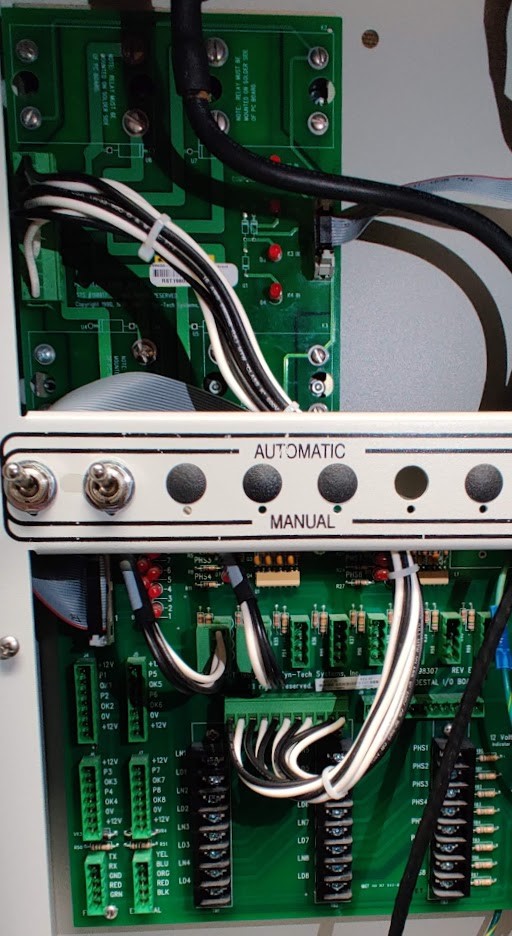
2.Open the Pedestal door and verify Automatic/Manual mode switches are switched up into Automatic.
![]()
3.Insert a Supervisor Key into the receptacle.
*SUPERVISOR MENU: 1=RPTS, 2=PM, 3=ODOM, 4=AIM,
A=CONFIG, B=ISSUES, C=DROPS, D=EXIT*
4.Select A for Configuration Menu.
*SUPERVISOR MENU: 1=RPTS, 2=PM, 3=ODOM, 4=AIM,
A=CONFIG, B=ISSUES, C=DROPS, D=EXIT*
5.Select B for Diagnostic test.
*CONFIGURATION: 13:58:47, 03/20/89*
*A=MODIFY, B=TEST, C=TIME/DATE, D=EXIT*
6.Select B for Count test.
1=SW, 2=OUTS, 3-LCD, 4=KEYPAD, A=PROKEE,
B=COUNT, C=POWER FAIL, D=EXIT
7. Observe the following Count Test display. The top row is for hoses 1 through 4, and the bottom row is for hoses 5 through 8.
FMU-2000 FMU-2500
1-4 ->> 0 0 0 0 CNT TEST 1-00000 3-
00000 5-00000 7-00000
5-8 ->> 0 0 0 0 D=EXIT 2-00000 4-00000
6-00000 8-00000
8.Switch the Automatic/Manual Mode Switch for the hose being tested down it Manual (testing one hose at a time).
9.Go to the fuel dispenser and turn the pump reset handle on.
10.Dispense (as accurately as possible) one gallon of fuel.
11.Observe the Count Test display. The 0 (or 0000) display for the hose being tested should count forward the number of pulses received to register one gallon.
a. A display of 10 or 00010 (+/-1) indicates a 10:1 pulser.
b. A display of 100 or 00100 (+/-10) indicates a 100:1 pulser.
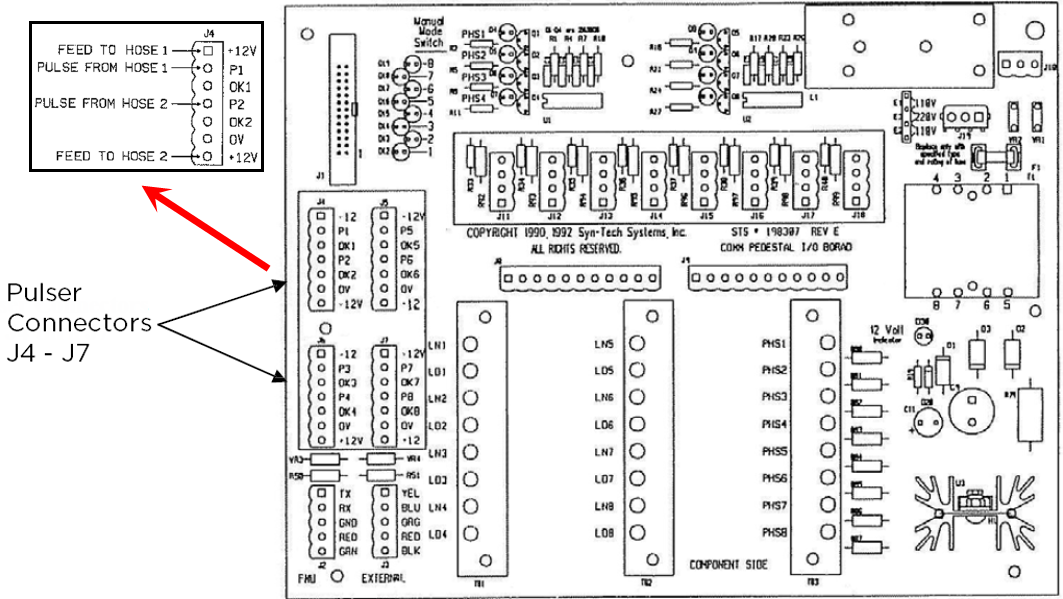
12.If the o (or 00000) display did not increment forward during the Count Test, generate pulses within the FMU to determine the serviceability of the FMU to power the pulser(s) and read the pulses (see figure):
a. Ensure all pump rset handles are turned off and remain off for the duration of this test.
WARNING: Electrical shock hazard! Do Not touch anyy bare conductors.
13.Remove the electrical access panel cover.
14.Ensure the LCD still displays:
FMU-2000 FMU-2500
1-4 ->> 0 0 0 0 CNT TEST 1-00000 3-
00000 5-00000 7-00000
5-8 ->> 0 0 0 0 D=EXIT 2-00000 4-00000
6-00000 8-00000
15.Ensure the applicable pump reset handle is turned off.
16.Disconnect the 7-pin connector (with wires attached) from the applicable J4 through J7 receptacle (J4 for hoses 1 and 2, J6 for hoses 3 and 4, J5 for hoses 5 and 6, and J7 for hoses 7 and 8). Using a jumper wire, momentarily touch a jumper wire between pins +12v (either of the two +12v in each receptacle) and P_(P1 for hose 1, P2 for hose 2, etc.) in the receptacle.
17. The applicable 0 (or 00000) display should increment forward. If the 0 (or 00000) display does increment forward, the FMU is generating pulser power and reading pulses, and a problem exists in the wiring between the FMU and the fuel dispenser pulser, or the fuel dispenser pulser is not functioning.
18.If the 0 (or 00000) display does not increment forward, a problem may exist in the FMU and additional troubleshooting is required with Syntech's Product Support personnel.
1.Insert the Supervisor's Key.
2.Select 3 for Odom.
![]()
3.Select B for Update.
![]()
4.Enter the new odometer.
![]()
WARNING: DO NOT attempt this procedure in a rainy environment! The FuelMaster Unit contains live electricity. If you feel uncomfortable at any time, stop immediately and call our Customer Satisfaction Center.
Losing the ability to fuel is always an issue that needs to be resolved efficiently. These steps may not always directly resolve your issue but are intended to identify common issues and to gather useful information for our Customer Satisfaction Center.
1.Open the pedestal of the FMU.
2.Flip the switch associated with the hose that is malfunctioning down into manual. In the below picture, hoses 3 and 5 are in manual.
![]()
3.Attempt to fuel on a malfunctioning hose.
4.If the dispenser doesn't fuel in manual, it is likely a dispenser issue. Call a dispenser technician to resolve this issue.
Once the fueling is authorized, the LCD should read Dispenser Activated, Turn Pump Handle Off, or Turn Pump Handle On.
If the LCD does not show one of these messages, report what it says to a Customer Satisfaction Center technician.
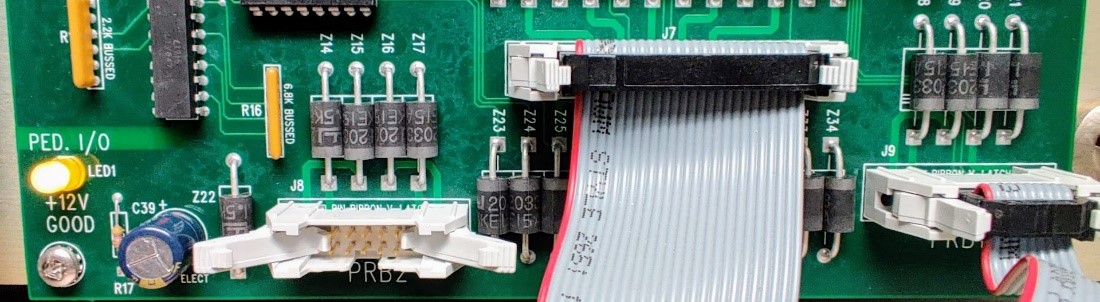
1.On the Sat I/O board in the head of the unit, reset the J7, J9, and J8 (if necessary) cables on both ends - the other end will go into the unit's pedestal.
Note: The J9 cable should be plugged into the left relay board, and the J8 cable (if necessary) should be plugged into the right relay board.
2.Ensure that the LED1 light is lit on the Sat I/O board.
3.In the pedestal, reseat the black-and-white cable between the relay board and Ped I/O board on both ends.
4.On the Ped I/O board, check the red D30 light.
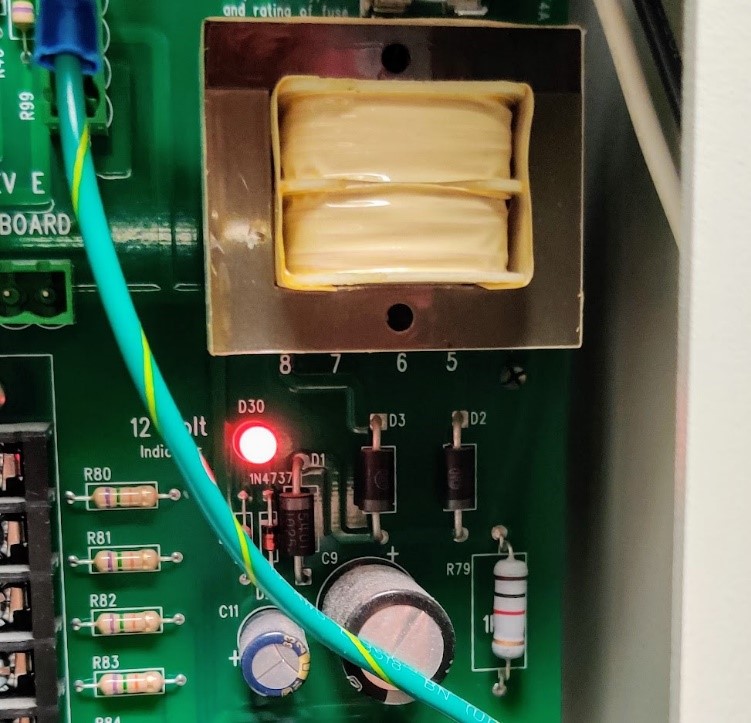
Tip: If it's not lit, take a picture of the Ped I/O board. Unplug all connectors (except for the terminal blocks) individually, noting if the D30 light is restored for that connector. If so, that component has an issue. If the D30 light doesn't come back on, contact our Customer Satisfaction Center for further assistance.
If these steps do not resolve your issues, please contact our Customer satisfaction center for assistance, as checking voltages within the FMU may be necessary.
1.Insert the Supervisor's Key.
2. Select B for Issues.
![]()
3.Select A for Manual.
![]()
4.Enter a User ID.
![]()
5.Enter a Vehicle ID.
![]()
6.Enter the Chronometer or Odometer.
![]()
7.Enter an Agency ID (if there isn't one, enter 1).
![]()
8.Select a Pump.
![]()
9.Begin fueling.
![]()
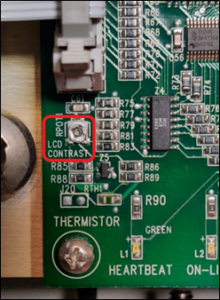
CAUTION! Be very careful when adjusting the contrast - the screw's range of motion is very small. The mainboard must be replaced if this part is damaged. The purchase of replacement parts may be required if the mainboard is damaged while adjusting the contrast.

The following are manuals on the usage of FMUs:
The following guide contains example reports that are generated by FMPlus:
This tutorial assumes:
1.In the vehicle, unplug the AIM and crank the vehicle. Let it run for 60 seconds.
2.Turn the engine off, but leave the key in the On position.
3.Put the PHT on the tank ring.
4.Insert your Supervisor's Key.
5.Select 4 for AIM.
![]()
6.Select 2 for AIM Config.
![]()
7.Select 1 for Program. The FMU will find the tag
![]()
8.Enter the Vehicle ID.
![]()
The screen will then read "AIM Programming Complete"
![]()
9.The FMU will then seek to calibrate the AIM. This is necessary even with dash odometer. Select 1 to calibrate the Odometer and 2 to calibrate the Chronometers.
![]()
This tutorial assumes:
1.In the vehicle, start with the key in the on position and the engine off.
2.Put the PHT on the tank ring.
3.Inset your Supervisor's Key.
4.Select 4 for AIM.
![]()
5.Select 2 for AIM Config.
![]()
6.Select 2 for Clean.
![]()
7.Select Y to confirm cleaning.
![]()
The screen will then read Clean Complete, and the module will reboot.
8.When the module reboots, crank the vehicle, and let it run for 60 seconds before attempting to reprogram.
The following are manuals for the installation of an AIM device:
This tutorial assumes:
1.Insert the Supervisor's Key.
2.Select C for Fueling Points (Fueling Positions).
![]()
3.Select B for Reenable.
![]()
3.Select the Fueling Point (Fueling Position) to reenable or 0 to reenable all.

The FuelMaster® Unit will give you the following message if successful:
![]()
5.Select D twice to exit the Supervisor's Key menu.
This tutorial assumes:
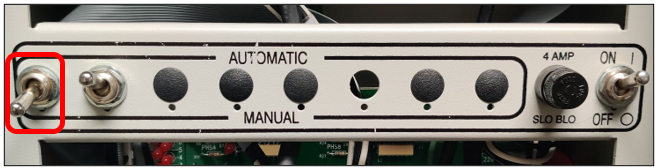
Open the pedestal of the FuelMaster® Unit (hereafter referred to as a Unit), and flip the appropriate auto/manual switch down into Manual. In the image below, Fueling Position 1 is in manual, Fueling Position 2 is in automatic.
1.Insert the Utility Prokee.
2.Select A for Config.
![]()
3.Select B for Tests. Continue to Run the Count Test.
![]()
1.Select Enter.
2.Select 2 for Diagnostics. Continue to Run the Count Test.
![]()
1.Select 5 for Count.
![]()
The Count Test screen should appear as follows
![]()
2.Dispense 1 gallon (or equivalent) on the applicable hose.
3.Your screen should show the number of your hose, a dash and a number of pulses.
Note: For example, a count test run on hose 1 with a 100:1 pulser should read 1-00100. If your screen shows the number of your hose, a dash, and no pulses (1-00000 from the example above), then the FMU is not receiving any pulses from the dispenser. We recommend contacting a FuelMaster Certified Distributor to resolve this dispenser issue.
4.Return the appropriate auto/manual switch up into Automatic.
5.Select D 4 times to exit the Supervisor's Key menu.
1.Encoder drivers are available on our website at https://www.myfuelmaster.com/download/USBEncoderInstall.zip.
2.On the bottom of the encoder, ensure the label reads USB Prokee (or Smartcard) Encoder, ARM7. If this is not the case, please contact the Syntech Customer Satisfaction Center for a replacement.
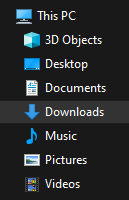
3 .Open a File Explorer window and browse to Downloads folder or click on the file at the bottom of the screen.
 or
or ![]()
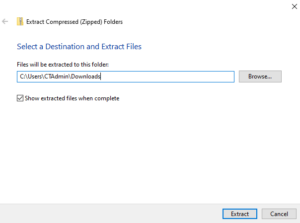
4.Select Extract All.
![]()
5.Select Extract. (This will extract all the files to the same location.)
6.Open the Computer Management app. This may need to be run as administrator to install drivers.
7.On the left side, select Device Manager.
8.Under the Other devices section, find and select the SYN-TECH EN-PR 200 or SYN-TECH EN-SC 200.
9.Select Update Driver button.
10.Select Browse my computer for drivers.
11.Select Browse...
12.Browse through the folder levels to find the path from Steps 5, then click OK.
13.Click Next.
14.Your computer may ask you to verify the driver installation, but when done, you should see that the driver has been installed successfully.
15.Reopen your software and encode the keys or smartcards.
| Assumptions |
|
This tutorial assumes...
|
1. Select the Users dropdown arrow.
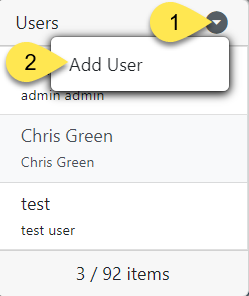
2. Select Add User.
3. Provide a User Name for the account.
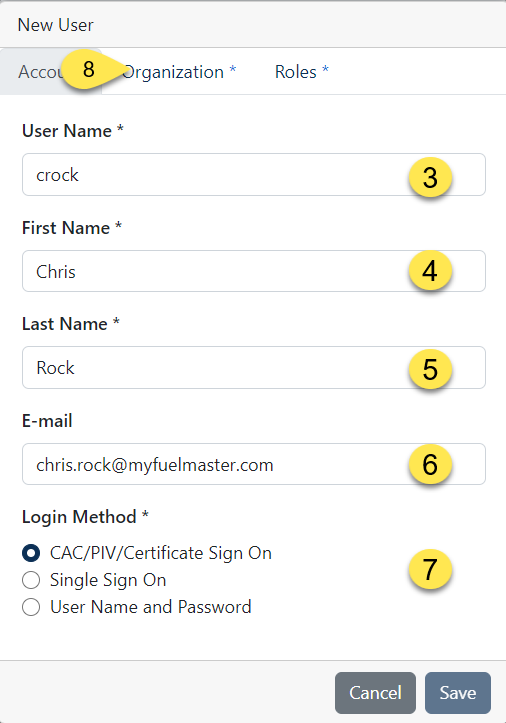
4. Enter the user’s First Name.
5. Enter the user’s Last Name.
6. Enter the user’s E-mail.
7. Select the Login Method.
| Login Method | Description |
| Single Sign On (SSO) | Disabled by default; Allows user to sign on with a set of credentials, stored in an identity provider (IdP). These credentials are typically used for the multiple applications and websites the user accesses. |
| CAC/PIV Sign On | Disabled by default; Allows user to sign on with one of two Smartcards: - Common Access Card (CAC) or Personal Identity Verification (PIV) Card. |
| Username and Password | Enabled by default; Allows the user to login with a username and password as well as verify account and reset password via email. |
8. Select the Organization tab.
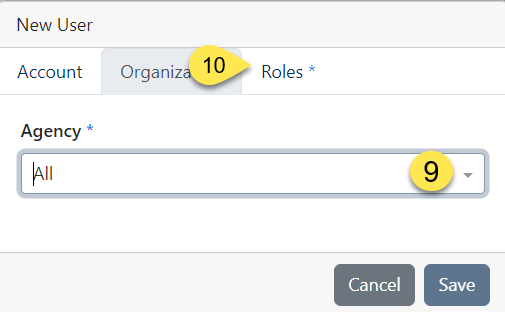
9. Assign the user to all or a specific Agency > Program Office > Office > Sub Office.
10. Select the Roles tab.
11. Select at least one role you wish the user to possess.
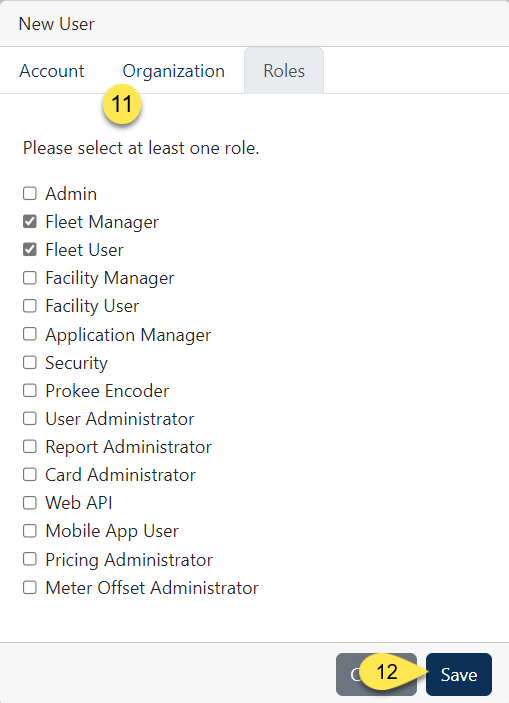
12. Select Save. The user will receive an Account Verification Email, which must be completed within 24 hours.
NBS (National Bankcard Services) is phasing out support for legacy analog phone lines (POTS – Plain Old Telephone Service). This industry-wide transition is already underway and affects businesses in all sectors. As carriers discontinue dial-up infrastructure, analog lines will eventually become inoperable for essential services like credit card authorization.
This decision is being driven by telecom carriers—not by Syntech or Processors like NBS. The analog phone network is aging, expensive to maintain, and increasingly unreliable. Carriers are moving to digital and IP-based technologies, and support for dial-based credit card authorization can no longer be guaranteed.
If your site uses NBS and analog phone lines for credit card authorization, you may soon lose the ability to process transactions. This could disrupt operations and impact customer service. Syntech is proactively reviewing all impacted accounts and offering modern, secure connectivity alternatives to ensure a seamless transition.
We recommend transitioning to:
You are affected if you are NBS customer and use analog phone lines for card authorization. Syntech will help you identify any locations still relying on POTS and work with you on a customized action plan.
Once POTS lines are shut down, dial-based systems will stop working. You will not be able to process card transactions, which could lead to service outages and lost revenue.
Absolutely. Syntech’s Technical Sales Consultants (TSCs) and Customer Satisfaction Center (CSC) Technicians are ready to:
Reach out to your assigned TSC for more information about upgrade pricing.